Lightroom is considered one of the best photo editing software available. It offers various tools to apply various customization to your photos. Basically, Lightroom comes with some in-built presets. But it also allows users to install and use more presets in it.
Therefore, if you don’t have the VSCO Film presets in the collection, there’s nothing to worry about. You can easily install this preset in your Lightroom by importing it from your computer.
In this post, we’re going to give you directions on how you can install the VSCO Film presets. So, without any more delay, check the procedures given in the following part and apply them accordingly.

How Do I Install VSCO Film Presets in Lightroom PC
The main formula for installing VSCO presets is pretty simple. Just import the VSCO Film packs in Lightroom from the location where they are stored. These preset packs contain an installer that helps to add the presets to other Lightroom versions.
Now, if you don’t have the presets in your system, first of all, you need to download them from their official website. Most likely it’ll be downloaded in a zipped format. Fortunately, the latest versions of Lightroom allow zipped folders to be added directly without unzipping them.
So, you can import the VSCO presets in three different yet effective ways. Here are them one by one –
Way 1: Through the Menu Bar
In this way, you’ve to install the presets by adding them through the menu bar. To do that –
Step 1: Open the Lightroom program.
Step 2: Get into the Develop module.
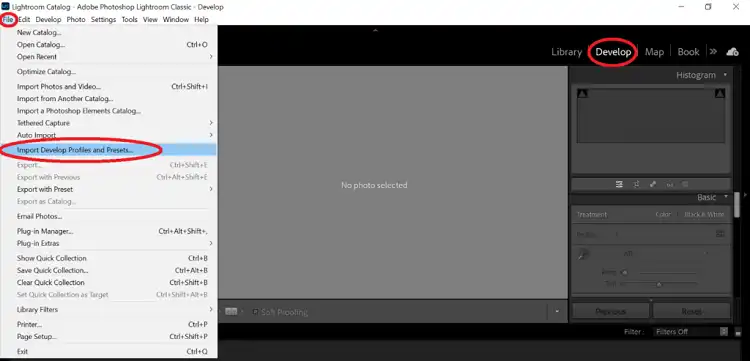
Step 3: Now, in the menu bar, click on the File section.
Step 4: Then select the Import Develop Profiles and Presets option.
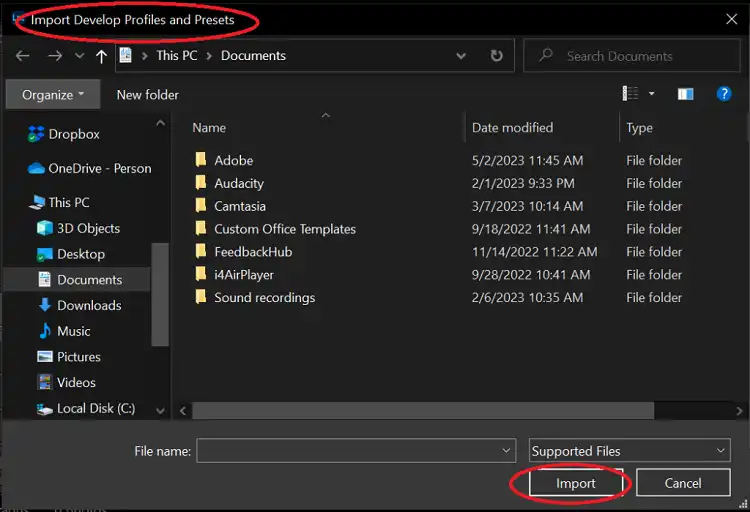
Step 5: After that, navigate to the location where you stored the presets. Select it and choose Import.
Way 2: Through the Presets Panel
In this case, you can install the presets by adding them from the Presets panel. Therefore –
Step 1: Open Lightroom and go to Develop module.
Step 2: At the left, you can find the Lightroom interface where the Preset panel is available. Just click on the + button next to it.
Step 3: Now, select the Import Presets option.
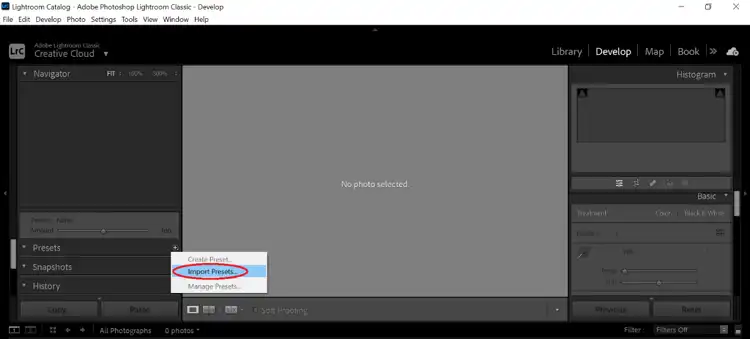
Step 4: Similarly, navigate to the location where you downloaded the presets. Select and import it.
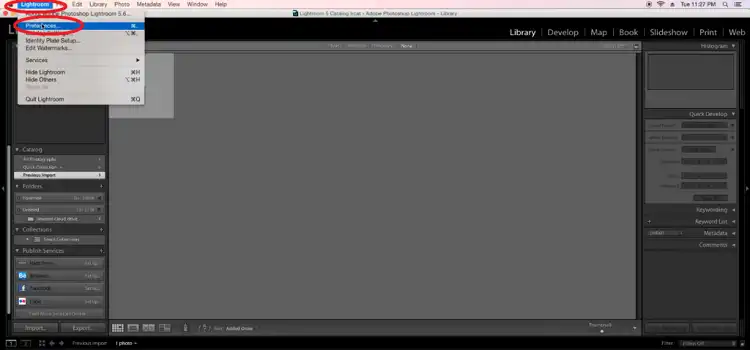
Way 3: Through the Preferences Panel (Mac)
If you’re a MacOS user, this way is suitable for you. The way is a lot easier. Just –
Step 1: Open the Lightroom application and click on Lightroom at the top-left corner.
Step 2: Select Preferences.
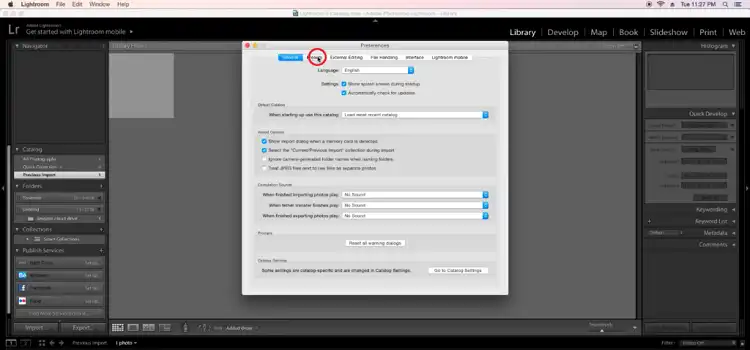
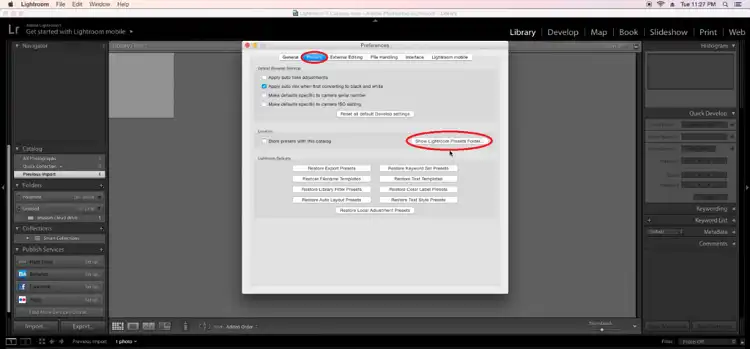
Step 3: After that, get into the Presets tab and click on Show Lightroom Presets Folder.
Step 4: Next, get into the Lightroom folder and then Develop Presets.
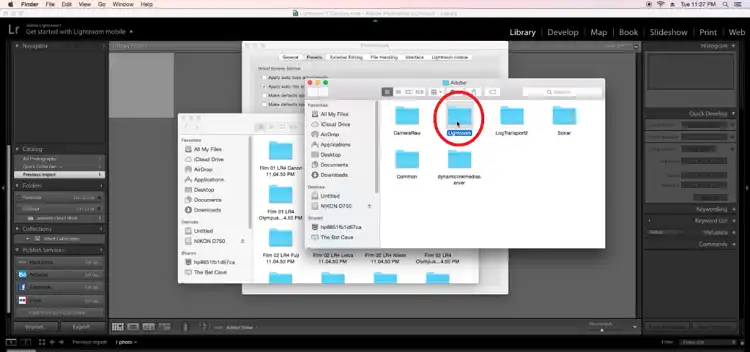
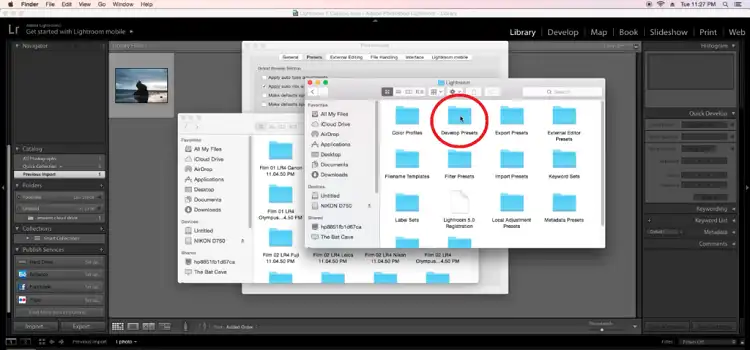
Step 5: Now, simply drag and drop the VSCO Film presets folder from the saved location to this Develop Presets folder.
That’s it.
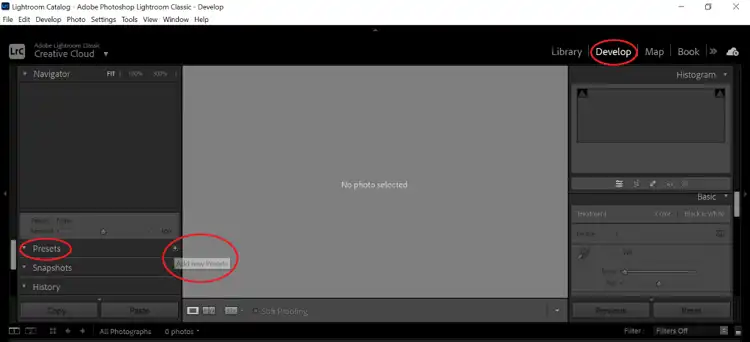
After applying any of these methods, you can find the VSCO presets in the Develop module, in the Presets panel list.
how to install VSCO film In lightroom
Procedures to Install VSCO Film Presets in Lightroom Mobile
This is a pretty simple procedure and requires installing the presets in your Lightroom PC first. The main criterion for installing them in your mobile app is to turn on the sync (synchronization) from the PC app. Try the following steps accordingly to turn on syncing –
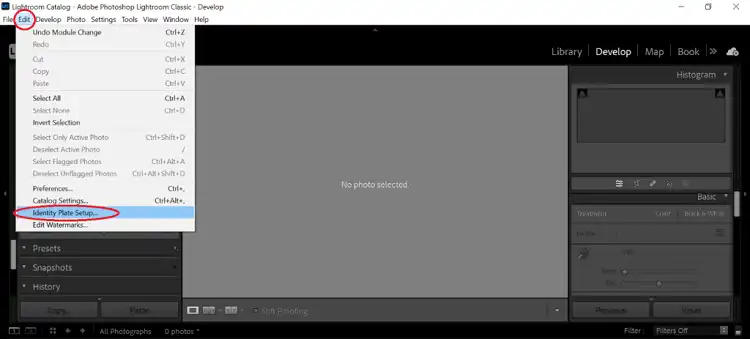
Step 1: When you’ve successfully installed the presets in your Lightroom PC version, click on Lightroom at the top-left corner and select Identity Plate Setup (for Mac). Or get into the Edit section and then select Identity Plate Setup (for Windows).
Step 2: After clicking the drop-down arrow of the identity plate, you can notice the option Sync with Lightroom. If you find it in the Paused situation, just click on the play button below it.
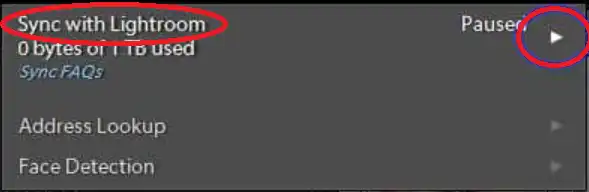
This way the VSCO presets will automatically get installed and show in the Presets panel in your mobile app.
Frequently Asked Questions and Answers (FAQs)
Why are my VSCO presets not showing in Lightroom?
The main reason your VSCO presets aren’t showing is the checkbox for the Show Partially Compatible Develop Presets option is unchecked. In this case, you should navigate through Menu > Preferences > Presets > Visibility and check the checkbox for the option.
Is VSCO app better than Lightroom?
The truth is Adobe Lightroom provides more advanced features than VSCO. Especially, in terms of color correction, Lightroom shows much more capability compared to VSCO. Another fact with VSCO is it doesn’t allow users to edit photos after taken. Therefore, it can be said that according to these facts, Lightroom is superior to the VSCO.
Is using Lightroom presets worth it?
Yes, it is. They are designed by photographers and designers who have expertise in graphics and colors. That’s why users actually don’t have to get worried about the quality and result of the presets as they are so convenient to use. These presets are capable of providing amazing effects on your photos. Moreover, as they let users perform a long editing process with just a solo click, it helps users to save a lot of time.
Conclusion
That’s all about installing the VSCO Film Lightroom presets in the Lightroom application. Applying any of the methods will definitely install them. If you find this post useful, tell us which method does the job for you. If you’ve further questions, feel free to knock us.